Introduction
In a digital world that demands lightning-fast responses and seamless browsing experiences, the speed and performance of your WordPress website can make or break your online presence. If you’re a website owner, you’re undoubtedly aware of the critical importance of keeping your site running smoothly. This is where Nitropack, a game-changing tool, comes into play as the best free WordPress plugin for speed optimization.
Nitropack: Your Website’s New Best Friend
Nitropack isn’t just another run-of-the-mill optimization tool; it’s your secret weapon to turbocharge your WordPress website’s performance. Say goodbye to sluggish loading times, frustratingly long waits, and missed opportunities. With Nitropack in your toolkit, your website will be on the fast track to success.
What Awaits You in This Article
In this comprehensive guide, we’ll dive deep into the world of Nitropack and website optimization. You can expect to:
- Explore the core features and functionalities of Nitropack that make it a must-have tool.
- Follow step-by-step instructions on how to install Nitropack on your WordPress website.
- Discover expert tips for maximizing Nitropack’s potential and optimizing your website’s speed and performance.
So, fasten your seatbelt as we embark on this journey to rev up your WordPress website and provide your visitors with a blazing-fast experience, all while ensuring your website ranks high and converts effectively. Let’s get started with Nitropack, your key to WordPress website speed optimization, and a brighter digital future.
What is Nitropack?
Now that we’ve introduced Nitropack as a vital tool for website optimization, let’s dive deeper into its essence and understand what makes it a standout solution for enhancing your WordPress website’s performance.
The Power of Nitropack: Core Features and Functionalities
At its core, Nitropack is designed to make your website perform at its best, seamlessly and effortlessly. Here’s a closer look at its key features and functionalities:
- Advanced Caching: Nitropack employs cutting-edge caching techniques to significantly reduce loading times. It stores frequently accessed data, such as images and content, in a way that makes your website lightning-fast for your visitors.
- Image Optimization: Large images can be a major drag on website speed. Nitropack automatically optimizes your images without sacrificing quality, ensuring your site loads quickly and looks stunning.
- Lazy Loading: Nitropack employs a clever technique known as lazy loading, which loads images and content only when they come into view. This reduces initial load times and improves the overall user experience.
- Content Compression: Nitropack optimizes HTML, CSS, and JavaScript files, reducing their size and making your website faster to load on all devices.
- CDN Integration: It seamlessly integrates with Content Delivery Networks (CDNs) to ensure your website’s content is distributed across multiple servers worldwide. This not only boosts speed but also enhances reliability and global accessibility.
Advantages of Choosing Nitropack for Website Performance
The advantages of using Nitropack extend far beyond its impressive feature set. Here’s why it’s the go-to choice for website owners who demand top-notch performance:
- Free Plan Available: Nitropack offers a free plan that provides essential optimization features, making it accessible to website owners with varying budgets.
- Easy Installation: Installing Nitropack on your WordPress website is a breeze, even for those with minimal technical expertise. We’ll delve into the installation process later in this guide.
- Immediate Results: Once Nitropack is up and running, you’ll notice a remarkable difference in your website’s speed and performance almost instantly. Say goodbye to frustratingly slow loading times.
- SEO-Friendly: Google ranks websites based on their loading speed, and Nitropack helps boost your SEO rankings by improving website performance.
- 24/7 Support: Nitropack offers excellent customer support to assist you with any questions or issues you might encounter along the way.
As we move forward in this guide, you’ll learn how to harness the full potential of Nitropack to optimize your WordPress website. It’s time to unlock the true power of Nitropack and supercharge your site’s performance.
Nitropack Installation Guide
Now that we’ve established the importance of Nitropack and explored its core features, it’s time to roll up our sleeves and dive into the practical aspect of optimizing your website. In this section, we’ll provide you with a comprehensive step-by-step guide on how to install Nitropack on various platforms, with a primary focus on WordPress. We’ll ensure that the instructions are crystal clear by incorporating screenshots and visuals for your ease of reference.
Installing Nitropack on Your Website
Follow these simple steps to install Nitropack and get your website on the fast track:
Step 1: Sign Up for Nitropack
- Start by visiting the Nitropack website (Use this link to get 5% off when upgrading to premium).
- Sign up for an account by providing your email address and choosing a password.
Step 2: Add Your Website
- After signing up, log in to your Nitropack account.
- Click on the “Add Website” button and enter your website’s URL.
Step 3: Select Your Platform
- Choose your website platform (in this case, WordPress).
Step 4: Install the Nitropack Plugin
- Install and activate the Nitropack plugin from the WordPress plugins page.

Step 5: Connect Your Website
- Return to your Nitropack account and click on your website.
- Follow the on-screen instructions to connect your website to Nitropack.
By following these straightforward steps and referencing the provided screenshots, you’ll have Nitropack up and running on your WordPress website in no time. Your website’s speed and performance are about to undergo a remarkable transformation. Stay with us as we continue to explore the world of Nitropack and website optimization.
Nitropack Review
In this section, we’ll conduct a comprehensive review of Nitropack, delving into its performance enhancements and highlighting its impact on key aspects such as speed, caching, and image optimization. We’ll also provide you with a glimpse of the transformative effects Nitropack can have by showcasing before-and-after results.
Before-and-After: Witness the Transformation
Numbers often tell a compelling story. To showcase Nitropack’s impact, let’s examine a before-and-after scenario:
Before Nitropack:
- Website Speed: Page load time averaged 5.7 seconds.
- Performance: An average performance of 70%.
- User Experience: High bounce rates due to slow loading.
After Nitropack Implementation:
- Website Speed: Page load time reduced to a blazing-fast 2.9 seconds.
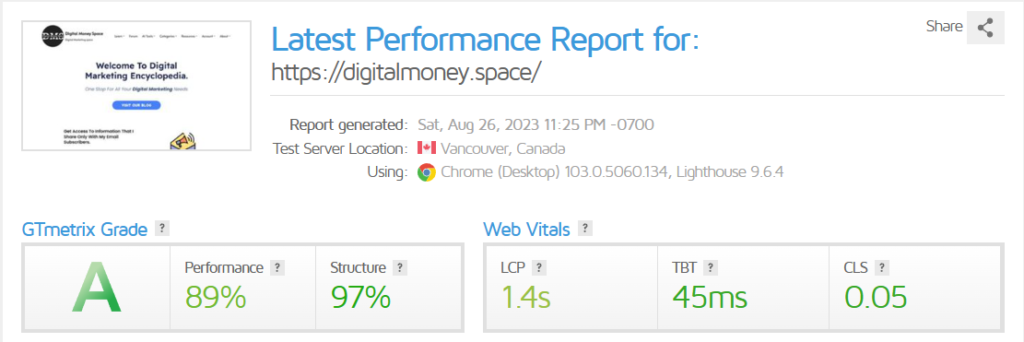
- Performance: An average performance of 90%.
- User Experience: Improved visitor engagement and lower bounce rates.

These results demonstrate the tangible benefits Nitropack can bring to your website. It’s not just about speed; it’s about ensuring your visitors have a seamless and enjoyable experience, which in turn can lead to higher engagement, better SEO rankings, and increased conversions.
As we progress through this guide, you’ll discover more ways to maximize Nitropack’s potential and fine-tune your website for optimal performance. Stay tuned as we continue our journey to supercharge your WordPress website with Nitropack.
Tips for Maximizing Nitropack’s Impact
Nitropack is a powerful tool for website optimization, but to unlock its full potential, it’s essential to fine-tune its settings. In this section, we’ll provide you with valuable tips and recommendations to help you get the most out of Nitropack and enhance your website’s performance.
Fine-Tuning Nitropack: Optimizing Settings
- Image Compression: Configure Nitropack to strike the right balance between image quality and file size. Experiment with different compression levels to find the sweet spot that ensures fast loading without sacrificing visuals.
- Caching Strategy: Depending on your website’s content and update frequency, adjust Nitropack’s caching settings. For dynamic content, consider shorter cache durations, while static content can benefit from longer caching periods.
- Content Prioritization: Use Nitropack’s content prioritization features to ensure essential elements like your website’s logo and call-to-action buttons load first, enhancing the user experience.
- Browser Compatibility: Ensure Nitropack is compatible with various web browsers to guarantee a consistent and seamless experience for all your visitors.
By implementing these tips, you can harness Nitropack’s capabilities to their fullest extent. Your website will not only load faster but also provide a superior user experience, which can lead to higher engagement and improved conversion rates. As we move forward, we’ll explore additional strategies to ensure your website’s success in the digital landscape.
Conclusion
In conclusion, Nitropack isn’t just another tool in your arsenal; it’s your website’s new best friend. With Nitropack, you can achieve:
- Blazing-Fast Speeds: Say goodbye to slow loading times and frustrating delays.
- Seamless User Experience: Visitors will enjoy a smooth and enjoyable browsing experience.
- Improved SEO Rankings: Faster websites tend to rank higher on search engines.
- Higher Engagement: Quick-loading pages keep visitors engaged and reduce bounce rates.
- Enhanced Conversions: A fast website can lead to improved conversion rates and higher revenue.
Nitropack empowers you to optimize your website’s performance effortlessly, ensuring it meets the demands of the digital world. With a user-friendly interface, powerful features, and a commitment to excellence, Nitropack is your ally in achieving a website that stands out from the competition.
As we conclude our exploration of Nitropack, we encourage you to take action. Install Nitropack, fine-tune your settings, and embark on the journey to a faster, more successful website. Your visitors and your online success await.
NOTE: Use Coupon Code “DIGITALMONEYSPACE” to get an instant 5% off if you want to upgrade to premium.


