
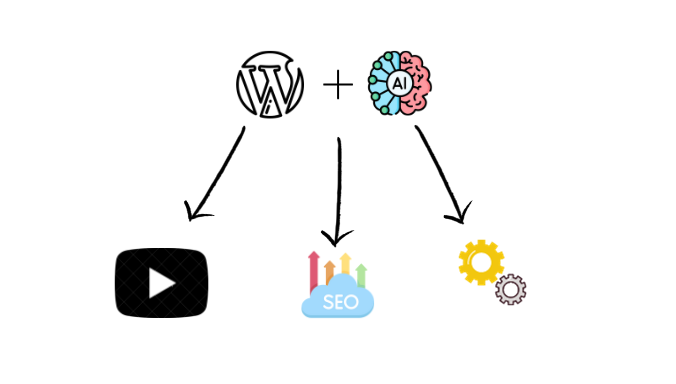
Your WordPress website is like your virtual home on the internet, and we’re here to tell you about a fantastic way to make it even more welcoming. You can actually make your own AI online in wordpress, and today, we’re going to be your friendly guides in showing you how to build something special – the “Free AI Facebook Ad Generator.”
Imagine having a clever assistant living on a dedicated page of your website, powered by AI, and its job is to craft fantastic Facebook ad copy. It might sound complicated, but it’s not. No tech talk or confusing terms here – just a friendly chat to make it all simple.
It’ll help you create ads that really speak to your audience. But it’s not just about technology; it’s about making your website more engaging and dynamic. So, let’s embark on this journey together and see how the “Free AI Facebook Ad Generator” can turn your WordPress site into a marketing superstar.
Acquiring the AI API Key for WordPress: Your Gateway to AI Magic:
Your WordPress website is about to enter a whole new dimension of possibilities, thanks to the AI API key. But what exactly is this key and why is it your gateway to AI magic?
Understanding the AI API Key:
The AI API key is the handshake between your WordPress site and artificial intelligence. It’s the key that opens doors to an array of smart functionalities. With this key, you empower your WordPress site to interact with AI tools, enabling it to generate content, offer suggestions, or, in this case, create captivating Facebook ad copy.
Why It Matters:
The AI API key is like the heart of AI integration. It’s the key that connects your WordPress site with AI tools, allowing them to work together in creating content and engaging with users. Without it, your website would be missing a crucial tool, much like a musician without an instrument.
Obtaining Your AI API Key:
The process of acquiring your AI API key is straightforward. It’s designed to make your journey into AI integration as smooth as possible:
- Select Your AI Service Provider: Begin by choosing an AI service provider. A popular choice is OpenAI, known for its powerful AI tools, including the “ChatGPT”
- Sign Up and Create an Account: After choosing your provider, sign up on their platform by providing your email address, and creating a password.
- Navigate to API Key Generation: Once your account is created, head to the API key generation section. Your chosen AI service provider will guide you through this process, which might include setting up a new application or project to associate with your API key.
- Copy and Secure Your API Key: After the key is generated, it will typically be displayed on your dashboard. Copy it and store it securely, like a digital treasure, to avoid misplacing it.

The Security Side:
Remember, your AI API key is like a digital identity card for your website. Safeguard it to protect your site and its AI-powered functionalities from potential threats.
This is your initial stride into the world of AI magic, poised to transform your WordPress site into an interactive and dynamic digital powerhouse.
Installing a Plugin and Creating a PHP Snippet:
With your API key in hand, it’s time to make your WordPress website AI-ready. This section will guide you through the process of installing a plugin of your choice and creating a PHP snippet that forms the bridge between your WordPress site and the magic of the GPT-3.5 Model.
Selecting Your Plugin:
You have the flexibility to choose the plugin that suits your preferences. While WPCode is a popular choice, many plugins can facilitate AI integration on your WordPress website. Some popular options include WPCode, AIWP, and WPGenius. We will be using WPcode in this tutorial.
Step-by-Step Guide:
Here’s a straightforward, step-by-step guide to get you started:
- Login to Your WordPress Dashboard: Begin by logging into your WordPress dashboard.
- Navigate to the Plugins Section: Once you’re in the dashboard, find the “Plugins” section on the left-hand menu. Click on it to open the Plugins page.
- Add New Plugin: On the Plugins page, you’ll see an “Add New” button. Click on it to add a new plugin.
- Search for WPCode: In the search bar, type “WPCode” and hit Enter. This will display the WPCode plugin among the search results.
- Install and Activate: Click “Install Now” next to the WPCode plugin. After installation, click “Activate” to enable it on your website.
- Create a PHP Snippet: With the WPCode plugin activated, you can now create a PHP snippet. This snippet will serve as a bridge between your website and the GPT-3.5 model. You’ll provide the API key in the snippet to enable AI interactions.
Configuring the PHP Snippet:
Here is the code:
function openai_generate_text() {
    // Check if the user is logged in
    if (!is_user_logged_in()) {
        $login_url = home_url('/login');
        wp_send_json_error('You must be logged in to use this tool.');
    }

    // Get the topic from the AJAX request
    $prompt = $_POST['prompt'];

    // OpenAI API URL and key
    $api_url = 'https://api.openai.com/v1/chat/completions';
    $api_key = 'YOUR_API_KEY';  // Replace with your actual OpenAI API key

    // Headers for the OpenAI API
    $headers = [
        'Content-Type' => 'application/json',
        'Authorization' => 'Bearer ' . $api_key
    ];

    // Body for the OpenAI API
    $body = [
        'model' => 'gpt-3.5-turbo',
        'messages' => [['role' => 'user', 'content' => $prompt]],
        'temperature' => 0.7
    ];

    // Args for the WordPress HTTP API
    $args = [
        'method' => 'POST',
        'headers' => $headers,
        'body' => json_encode($body),
        'timeout' => 120
    ];

    // Send the request
    $response = wp_remote_request($api_url, $args);

    // Handle the response
    if (is_wp_error($response)) {
        $error_message = $response->get_error_message();
        wp_send_json_error("Something went wrong: $error_message");
    } else {
        $body = wp_remote_retrieve_body($response);
        $data = json_decode($body, true);

        if (json_last_error() !== JSON_ERROR_NONE) {
            wp_send_json_error('Invalid JSON in API response');
        } elseif (!isset($data['choices'])) {
            wp_send_json_error('API request failed. Response: ' . $body);
        } else {
            wp_send_json_success($data);
        }
    }

    // Always die in functions echoing AJAX content
    wp_die();
}

add_action('wp_ajax_openai_generate_text', 'openai_generate_text');
add_action('wp_ajax_nopriv_openai_generate_text', 'openai_generate_text');
By the way, all the code is written by ChatGpt.
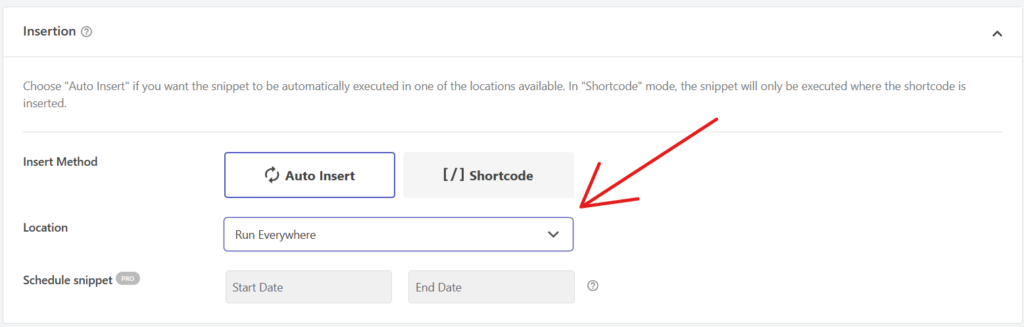
In the PHP snippet, ensure to:
- Replace your API key in the 12th line of the code.
- Select “Run Everywhere” Option: Choose the “Run Everywhere” option to make your AI interactions available throughout your website.
- Activate the Script: Be sure to activate the script as shown below for it to function correctly.

Crafting Effective AI Tool Prompts
Unlocking the full potential of AI on your WordPress website goes beyond the technical aspects – it’s about crafting the right prompts that engage the AI tool effectively. In this section, we’ll dive into the art of constructing prompts, provide practical examples, and offer valuable tips for creating prompts that yield meaningful results.
Constructing Effective Prompts:
The Art of Precision:
The creation of effective prompts feels similar to art. It’s about guiding the AI tool to produce the specific content you need. For instance, if you want to generate engaging blog post introductions, your prompt should be crystal clear. Consider using prompts like, “Create an attention-grabbing blog introduction on the topic of ‘digital marketing trends for 2023’.” The key is to be precise in your request, providing the AI with the exact target.
Contextual Clarity:
Context is the guiding light for AI. The more context you provide in your prompts, the better the AI’s response. For example, if you ask, “Write a product description,” the AI may generate a generic response. However, by adding context, like “Write a product description for a new smartphone targeted at tech-savvy consumers,” you’ll receive a more tailored outcome that resonates with your audience.
Practical Examples and Tips:
Prompt Formulas:
Practicality is at the heart of crafting prompts, and to take things up a notch, let’s explore some advanced prompt formulas:
- SEO-Optimized Content Formula: When aiming for content that ranks well on search engines, use a prompt like “Generate an SEO-optimized article on ‘on-page SEO best practices for 2023’ with a word count of 1,000 words.”
- Product Comparison Formula: Crafting detailed product comparisons is made easier with a prompt like “Create a comparison guide between ‘Product A’ and ‘Product B,’ highlighting their key features, benefits, and pricing.”
- Complex Data Analysis Formula: If you’re diving into data analysis, you can ask the AI for help with a prompt like “Analyze the provided dataset and generate insights on the correlation between ‘Variable X’ and ‘Variable Y.'”
Avoiding Pitfalls:
Crafting prompts comes with its own set of challenges. One common pitfall is providing vague or misleading instructions, which can result in suboptimal results. It’s vital to avoid ambiguous queries and misleading phrasings.
By focusing on practical examples, advanced prompt formulas, and tips, you’ll gain the knowledge and confidence to create prompts that bring out the best in AI, making your WordPress site a hub for intelligent interactions and dynamic content creation.
Access to Free Prompts Library:
To further simplify your journey into prompt creation, we offer access to a free prompts library. This resource provides a collection of ready-made prompts for diverse applications. It’s your treasure trove of pre-constructed queries that can expedite the process of harnessing AI’s capabilities for your WordPress site.
With these insights, you’ll be well-prepared to master the art of crafting effective prompts, transforming your WordPress site into an AI-driven content creation and user engagement hub.
In the following section, we’ll explore how you can create different AI tools with the same code, providing versatility to your AI-powered WordPress site.
The Versatile AI Tool: One Code, Infinite Possibilities
In this section, we give you the entire code. With one code and a simple prompt, you can turn it into a Free AI Facebook Ad Generator, an AI YouTube Title Generator, or anything else you desire.
Complete Code:
<div id="text-generation-tool" class="tool-container">
    <h2 class="tool-heading">Free AI Facebook AD Generator</h2>
    <div class="input-container">
        <input type="text" id="topic" placeholder="What is the AD about?">
    </div>
    <button id="generate-button">Generate Copy</button>
    <div id="loading" class="custom-loader" style="display: none;"></div>
    <div id="result-container" style="display: none;">
        <h3 class="result-heading">Generated Copy</h3>
        <div class="result-content">
            <textarea id="result" readonly></textarea>
        </div>
        <button id="copy-button">Copy to Clipboard</button>
    </div>
</div>

<style>
    /* Common styles for all screen sizes */
    body {
        font-family: 'Poppins', sans-serif;
    }

    .tool-container {
        max-width: 600px;
        margin: 20px auto;
        padding: 20px;
        border: 1px solid #ddd;
        border-radius: 5px;
        background-color: #fff;
        box-shadow: 0 2px 4px rgba(0, 0, 0, 0.1);
    }

    .tool-heading {
        text-align: center;
        color: #3498db;
        margin-bottom: 20px;
    }

    .input-container {
        display: flex;
        justify-content: center;
        align-items: center;
        margin-bottom: 20px;
    }

    #topic {
        flex: 1;
        padding: 12px;
        font-size: 16px;
        border: 1px solid #ddd;
        border-radius: 5px;
        outline: none;
    }

    #generate-button {
        padding: 12px 24px;
        font-size: 16px;
        border: none;
        border-radius: 5px;
        color: #fff;
        background-color: #3498db;
        cursor: pointer;
        transition: background-color 0.3s ease;
        margin: 0 auto;
        display: block;
    }

    #generate-button:hover {
        background-color: #2980b9;
    }

    #generate-button.clicked {
        animation: bounce 0.8s ease;
    }

    .custom-loader {
        margin: 20px auto;
        border: 5px solid #3498db; /* Blue */
        border-top: 5px solid #f3f3f3; /* Light grey */
        border-radius: 50%;
        width: 50px;
        height: 50px;
        animation: spin 1s linear infinite;
    }

    #result-container {
        margin-top: 20px;
    }

    .result-heading {
        text-align: center;
        color: #3498db;
        margin-bottom: 10px;
    }

    .result-content {
        display: flex;
        justify-content: center;
        align-items: center;
    }

    #result {
        flex: 1;
        height: 400px;
        padding: 12px;
        font-size: 16px;
        border: 1px solid #ddd;
        border-radius: 5px;
        background-color: #f9f9f9;
        resize: vertical;
        margin-right: 10px;
        outline: none;
        color: black; /* Change the color of the generated copy to black */
    }

    #copy-button {
        padding: 12px 20px;
        font-size: 14px;
        border: none;
        border-radius: 25px;
        color: #fff;
        background-color: #3498db;
        cursor: pointer;
        transition: background-color 0.3s ease;
        margin-top: 10px;
        display: block;
        width: 100%;
    }

    #copy-button:hover {
        background-color: #2980b9;
    }

    /* Media queries for responsive design */

    /* Tablet */
    @media (max-width: 768px) {
        .tool-container {
            max-width: 90%;
        }

        #result {
            height: 300px;
        }
    }

    /* Mobile */
    @media (max-width: 480px) {
        .tool-container {
            max-width: 90%;
            padding: 10px;
        }

        .tool-heading {
            font-size: 20px;
        }

        #topic {
            font-size: 14px;
            padding: 8px;
        }

        #generate-button {
            font-size: 14px;
            padding: 10px 20px;
        }

        #generate-button.clicked {
            animation: none;
        }

        #result {
            height: 200px;
            font-size: 12px;
            padding: 8px;
        }

        #copy-button {
            font-size: 12px;
            padding: 10px 15px;
        }
    }
</style>

<script>
    document.getElementById("generate-button").addEventListener("click", function(e){
        e.preventDefault();

        var generateButton = document.getElementById("generate-button");

        if (generateButton.disabled) {
            return; // Prevent multiple clicks while content is being generated
        }

        generateButton.disabled = true;

        // Add the "clicked" class to the button to trigger the animation
        generateButton.classList.add("clicked");

        var topic = document.getElementById('topic').value;
        var prompt = "YOUR__PROMPT" + topic;

        var loading = document.getElementById('loading');
        var result = document.getElementById('result');
        var resultC = document.getElementById('result-container');

        loading.style.display = 'block';
        result.style.display = 'none'; // hide result textarea
        resultC.style.display = 'none';

        var formData = new FormData();
        formData.append('action', 'openai_generate_text');
        formData.append('prompt', prompt);

        fetch('/wp-admin/admin-ajax.php', {
            method: 'POST',
            body: formData
        })
        .then(response => response.json())
        .then(data => {
            loading.style.display = 'none';
            if(data.success) {
                result.value = data.data.choices[0].message.content;
                result.style.display = 'block'; // show result textarea
                resultC.style.display = 'block';
                generateButton.disabled = false;
                generateButton.classList.remove("clicked"); // Remove the "clicked" class to stop the animation
            } else {
                result.value = 'An error occurred: ' + data.data;
                result.style.display = 'block'; // show result textarea
                resultC.style.display = 'block';
                generateButton.disabled = false;
                generateButton.classList.remove("clicked"); // Remove the "clicked" class to stop the animation
            }
        })
        .catch(error => {
            loading.style.display = 'none';
            result.value = 'An error occurred: ' + error.message;
            result.style.display = 'block'; // show result textarea
            resultC.style.display = 'block';
            generateButton.disabled = false;
            generateButton.classList.remove("clicked"); // Remove the "clicked" class to stop the animation
        });
    });

    var copyButton = document.getElementById('copy-button');
    copyButton.addEventListener('click', function() {
        var result = document.getElementById('result');
        result.select();
        document.execCommand('copy');
        alert('Copied to clipboard!');
    });
</script>
How It Works:
We’ll take you through the process step-by-step, explaining how to integrate this code into your website. You’ll see how a single prompt can customize the AI tool’s behavior. For instance, if you input a prompt related to Facebook ad copy, your WordPress site instantly becomes a Free AI Facebook Ad Generator.
Examples of Versatility:
To make things crystal clear, we’ll provide practical examples of how to set prompts for different purposes:
- Free AI Facebook Ad Generator: Input a prompt like “Create a compelling Facebook ad for a tech gadget launch,” and watch the AI generate ad copy tailored to your needs.
- AI YouTube Title Generator: Change the prompt to “Suggest engaging YouTube video titles for a cooking channel,” and the same AI tool transforms into an AI YouTube Title Generator.
In the following section, we’ll explore how to integrate this code into your WordPress website, making it ready to respond to your prompt and serve your specific needs.
Integrating the AI Tool into Your WordPress Website
In this section, we’ll guide you through the process of integrating the AI tool code into your WordPress website, allowing it to respond to your prompts effectively. By following these steps, you’ll be ready to customize the tool for various purposes, whether it’s a Free AI Facebook Ad Generator, an AI YouTube Title Generator, or something entirely unique.
Step 1: Accessing Your WordPress Dashboard
To begin, log in to your WordPress dashboard.
Step 2: Navigating to the Page Editor
Choose the page on your WordPress website where you want to add the AI tool. If it’s an existing page, locate it in your Pages section. If you’re creating a new page, simply click on “Add New” to start from scratch.
Step 3: Adding the AI Tool Code
In the page editor, switch to HTML or Text mode. You can usually find this option in the upper-right corner of your editor. This is where you’ll paste the AI tool code.
Step 4: Customizing the Tool’s Appearance
After adding the code, you can customize the tool’s appearance by modifying the HTML and CSS. For example, you can adjust the tool’s title, button labels, or colors to match your website’s design.
Step 5: Testing the Tool
Save your changes and preview the page to ensure that the AI tool appears as expected. You can then input a prompt and see the AI tool in action. It should instantly respond to your request, generating content tailored to the prompt.
Step 6: Prompt Customization
The beauty of this AI tool lies in prompt customization. Depending on the prompt you provide, the tool’s functionality changes. For instance, you can input a prompt related to Facebook ad copy to convert it into a Free AI Facebook Ad Generator. Alternatively, a prompt related to YouTube video titles transforms it into an AI YouTube Title Generator.
By following these simple steps, your WordPress website can become a dynamic platform capable of catering to various content generation needs. Whether it’s ad copy, blog titles, or any other type of content, this tool adapts to your prompt, providing you with precisely what you need.
In case you have any questions or seek further guidance, feel free to ask in our dedicated forum or Facebook group, where a helpful community of users and experts is ready to assist you on your AI-powered journey.